 When working with the Variable Data Wizard, you can replace data with custom entries, or have it automatically serialize a set of data. This is useful for creating something like a series of hotel room badges with an increasing series of numbers. Lets go over how to do this!
First, take a look at the room badge and determine what elements will be replaced. In this case it would be the room number. Remove this element and import the resulting graphic into the queue. Right click on the job and select “Variable Data Wizard”.
On the Left you will see the following tools used in the VDW:
- Select.
- Zoom.
- Text.
- Image.
- Barcode.
- Contour cut when active.
- Bezier node edit when active.
- Variable data wizard.
The number removed in the original design needs to be added with the text tool. When you select the text tool, this will change the cursor to a mouse arrow with a letter T.
Draw a marquee by holding the left mouse button and dragging from the top left to the bottom right, creating the location where you want the text to appear. Any characters created in this box will be constrained to this area. Anything longer will be compressed to ensure the characters remain within its constraints.
The smartbar above will now be populated with font attributes. These consist of:
- Font.
- Font height.
- Font color.
- Line justification.
- Stroke line thickness and color.
- Corner type.
- Specify a bounding box behind the text, and it’s fill color.
Ensure the fonts you are using for the design have been previously installed so they are available in VDW. From there:
- Go to the font list on the left and scroll down to the desired font.
- Double click on the font name to make it the active font.
- The font size is defined in millimetres or inches depending on the measurement system you have set. You can click on the character color pull down and select from a diverse collection of preset colors.
In the drop-down list to the right, you can choose your line justification left, centre, or right. After the line justification you can define a stroke line thickness, stroke color and the corner shape of the stroke, sharp or rounded. Lastly, on the right of the smartbar, you can select a bounding box around the text. This is useful if you must cover existing text before you perform text replacement.
Going back to the task of setting up the hotel room number serialization on the badges, start by setting your font attributes. Begin entering the text you want to serialize. The text will likely not be in the correct position on the badge. You can use the alignment tools to position the objects properly on the layout. Start by using align to page size. Using the select tool, select the text.
Go to layout menu:
- Alignment and spacing.
- Align to page size.
- Choose centres horizontally.
Another option would be to select both the text and the design object, and through the same menu path, select align to last object and then “centres horizontally”.
Now that you have the layout set up, it’s time to serialize the numbers. Select the text you want serialized and click on the variable data wizard tool on the left. In the VDW dialog, change the function of the object (your text) to serialize in the drop-down list. Set the number of copies to your ideal amount, found above the Item to replace window. Click next.
This brings you to the area and margins dialog, which allows you to customize the output material size. If you’re happy with the size, click next.
You are now in the dialog for serialization. Here you can define the start value for a series of numbers, also known as the base value. These are the numbers that will be replaced. In the last column you’ll see the increment by which the value of each number will increase.
Highlight the your text in the Start value and click on Base value. It will show up as base value. To see how the design will look, press the preview button.
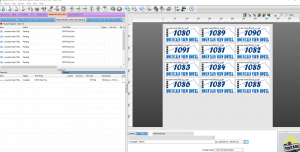
The left window shows the original design, and the right window shows how the printed badge will appear with the current values in the columns of start value, base value, and increment by. When you finish reviewing the preview, click ok.
To finalize the serialization, click finish. The jobs will be generated and sent to the queue. You can see in the preview, the resulting succession of the numbering in the jobs appearing in the queue.
To see these features in action, check out our video below: