Breaking up solid spaces in your designs can be a great way to make a design stand out and add creativity to your production. The stroke and fill tools adjust styles and fills of objects.

From left to right:
Line style: Select to apply a thin or thick line effect to a selected object.

From left to right:
- No line
- Hairline
- Thick line
- Line thickness
- Dotted line (gap and stroke)
- Lock proportions (aspect ratio)
- Line in front
- Line behind
- End caps (butt, extended, rounded)
- Corners (sharp, round, miter)
- Stroke colors
- Gradient stroke drop-down list: Select one color, linear (linear gradient that extends outwards from the center line), step (pinstripe effect with a sharp transition between colors), or bevel (halo effect with one dominant color and the other along the edges of the stroke).
- Set as default line setting
Gradient fills: Select to apply a gradient fill to a selected object (RGB colors).

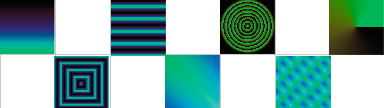
From top left:
- Linear fill
- Radial fill
- Conical fill
- Uniform fill
- Square fill
- Triangle fill
- Clear nubs (to remove control nubs previously added using the gradient slider)
Note: This button is visible after adding nubs. - Gradient slider: Use the slider to control the gradient.
Note: If you want to add new nubs that can be used to add new color, double-click on the gradient slider. - Color selection: Use the drop-down to launch the Color Selection dialog and edit colors.
- Position of fill (controls position where effect begins)
- Pinstripe
- Spectrum up: Gradient has first color on bottom and transitions to second color at top.
- Blend
- Spectrum down: Gradient has first color on top and transitions to second color on bottom.
- Angle of fill
- Repeats (use the drop-down to select style and the arrows to set number of repeats)
CMYK gradient fills: Select to apply a gradient fill to a selected object (CMYK colors).


From left to right:
- Linear fill
- Radial fill
- Square fill
- Gradient nub color
- Clear nubs (to remove control nubs previously added using the gradient slider)
- Gradient slider: Use the slider to control the gradient.
Note: If you want to add new nubs that can be used to add new color, double-click on the gradient slider. - Angle of fill
- Position of fill (controls position where effect begins)
Pattern fills: Select to apply a process color fill by tiling a bitmap.

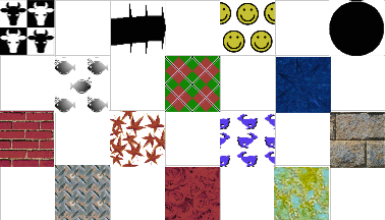
From left to right:
- Select pattern bitmap
- Cell width and height
- Lock proportions
- Cell x and y offset
- Skew fill
- Rotate fill
- Percent of tile x and y direction
- Enable partial fill
- Enable transparent color
- Color picker
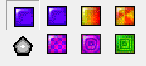
Spot gradient fills: Select to apply a gradient effect composed of one or two spot/foil colors.

From left to right:
- Linear fill
- Radial fill
- Square fill
- Duotone checkbox
- Base foil color
- Gradient slider: Use the slider to control the gradient.
Note: If you want to add new nubs that can be used to add new tint, double-click on the gradient slider. - Tint
- Angle
- Vertical and horizontal position
Multi-spot gradient fills: Select to apply a gradient effect using one or more spot colors.

From left to right:
- Linear fill
- Radial fill
- Square fill
- Base foil color
- Clear nubs (to remove control nubs previously added using the gradient slider)
- Gradient slider: Use the slider to control the gradient.
Note: If you want to add new nubs that can be used to add new color, double-click on the gradient slider. - Angle
- Add boost checkbox
- Vertical and horizontal position
Hatch fill: Select to apply a crosshatch or solid fill to a selected object.

From left to right:
- Tool width
- Fill angle
- Fill style
- Fill color
- Fill offset
Transparency fill: Select to apply effects that are transparent with objects below showing through.
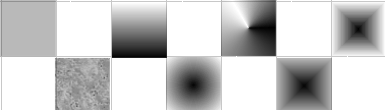
From top left, clockwise:
- No transparency
- Uniform fill
- Linear fill
- Conical fill
- Contour fill
- Pattern fill
- Radial fill
- Square fill
- *configuration is dependent on option chosen
You can of course combine effects from different tools to add more detail to your projects. Experiment will all these tools to perfect your designs!