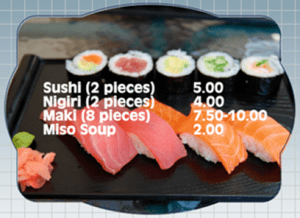
Did you know you can quickly and easily create complex graphic layouts using SignLab, EngraveLab, and ProfileLab? The “Menu boards” feature enables fully customizable design template creation, from the border shape to the image to the amount of information you want to display.
This example shows how to create a menu board and use the stroke tool.
Step One: Create a background frame and picture.
1) Go to Shape Tools and select a shape (or several) and weld them together to create a background frame.
2) Find an image you want to use as a background for the frame and import it. A JPEG works well.
3) Duplicate the background frame (Ctrl+D) and place one copy exactly over the other.
4) Take the image and place it between the two background frames. If the image does not cover the entire background, re-size it by dragging the handles in the corners.
5) In the Layer Viewer (View > Layer Viewer), select the bottom background and the image, then go to Arrange > Clipping > Clipping. If you move the top background frame, the bottom two layers should be clipped together in the shape of the background and using the image.
6) Select the top background frame, change the color to invisible by clicking on the palette.
7) With the background frame still selected, go to Stroke and Fill Tools > Line Style.
8) In the SmartBar, select thick line, and set it to 0.5, and use the drop-down list to select Linear.
9) Click the bottom color and set it to a different value, click OK, then on the workspace to close the SmartBar.

Step Two: Create the Layout.
1) Open Notepad and create four menu items in tab-delimited format:
name of item (tab) price of item
name of item (tab) price of item
name of item (tab) price of item
name of item (tab) price of item
2) Save the Notepad file as menu.txt and keep it open.
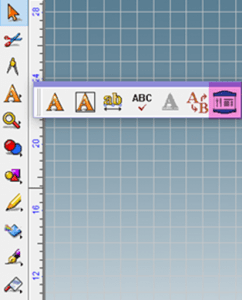
3) Go to Text Tools > Menu Board and click on the workspace to place the menu board. (The Menu Section Layout dialog will appear).
 4) Set four rows and two columns and set the width to 10 and the spacing to 0.5 and click OK. (The Text Toolbox dialog will appear.)
5) Copy the content of your Notepad file (Ctrl+C), click in the menu board in the top left cell, and paste (Ctrl+V). (The menu items will be pasted into the cells).
6) Select all the text in the menu board and change the font and font color.
7) Re-position the text and background so they fit together and use the nubs to re-size.
Step Three: Editing the Layout.
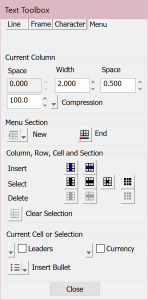
1) To add a currency character, select the text, and if the Text Toolbox is closed, open it by clicking Menu.
2) In the Text Toolbox dialog, you can make additional adjustments. See image for options.