 Suppose that the customer has provided you with a low resolution image, and you need to make it larger, and increase the resolution. Complicating matters is that the file was created using JPEG compression, which has introduced noise in the form of stray pixels.
With the Super Size image function, you can enlarge an image and clean it up at the same time! To do so:
- Select the job file within the queue.
- In the SmartBar, set the print dimensions that you need.
- From the “Jobs” menu, choose “Super Size Image”.
The dialog will prompt you to indicate the desired resolution.
The current resolution is lower than the images initial resolution because we had resized the print dimensions, which essentially spreads the image pixels over a wider area. Not to worry, we’ll specify here what the new resolution should be.
The best choice of image resolution depends upon the printing method, and the viewing distance. For inkjet printing, we generally set 300 as a reasonably high image resolution for this job. If the image were particularly detailed, then we might have considered a higher resolution of perhaps 600 or 1200, provided that the printer can print at that resolution. Setting an excessively high resolution is a waste of your time because the extra image data will add to the processing time, yet merely be discarded by the printer.
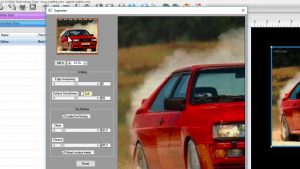 Click the thumbnail to focus on a specific area of the preview. With each click, we momentarily see the original image quality, but then see the clean version of the image. So in addition to increasing the resolution, we are also cleaning up the stray pixels that were caused by the JPEG compression. The defaults for these options will generally provide high quality results.
- Increasing the “Edge Sharpening” slider can add extra sharpness to the edges, and decreasing the slider will introduce more of a blurred effect.
- The “Surface Smoothness” affects the perceived texture of the image. A low value will produce a rough, jagged texture, whereas high values create a smooth, continuous surface.
- Turning ON the “Soft” option will create a gentle blurring that suggests softness within the image.
- For the noise that we previously mentioned, it is removed by the “De-Noising” option.
- The “Clean” slider will remove stray pixels, though a high value can potentially remove image details.
- The “Chroma” slider will adjust the amount of color saturation.
The “Vibrant Surface Tweak” option requires a bit of explanation. When noise and stray pixels are cleaned from an image, this can cause loss of minute details and contours that would otherwise add depth to the image. Where pixels have been cleaned, there is a subtle smoothing, as if a blur filter had been applied. However, enabling the “Vibrant Surface Tweak” option will retain these details, thereby improving image quality, especially when printing on large format media.
Click OK, and your job file is now ready to print. The preview will update after a few seconds.