 If you’ve been following along, you’ll know that the variable data wizard is a powerful tool for quickly serializing and replacing data, eliminating some tedious design work and saving you time. We can use the same features for text replacement, but for images! To walk through this, we suggest using a tab delimited text file saved out of Excel to control text and image replacement. We’ll describe some steps to follow along with.
To successfully use image replacement, the images should have the same dimensions. You will also need to have access to the images and know the path to the file location. This path will be used in the data file pointing VDW to the images.
Start by replacing the name and photo for each visitor. With the badge file loaded in the queue:
- Right click on the job.
- Select “Variable Data Wizard”.
Once the badge is loaded into VDW, you want to indicate where the name and the photo of each visitor will be placed. Starting with the name, using the text tool found on the left toolbar, click and draw a marquee under your image. This will indicate where the visitor’s name will go. The text box will constrain any text to within the box area. To set up the text for the name, set the font to your desired height and give it your ideal justification. Now type in your text. Next, we’ll place the image that will represent the size and position of the visitor photos.
Select the image placement tool found midway down the toolbar on the left. This will open a dialog where you will navigate to the location of the image you plan to use to set the placement on the badges. You can use common image formats such as BMP, JPEG, PNG, EPS and PDF.
Select your first image. It’s not important which image is selected, because the images will be controlled using the xml file. This will convert the cursor to a cross. Click where the top left of the image should start on the badge. This image represents the size and location of all the images to be used in this job.
For your project, the image may need to be scaled. Before scaling, ensure the “to fit” radio button is selected. This ensures all other images will be scaled to fit within the dimensions of this image. You can precisely position your image using the horizontal position or x value and vertical position or y value found in the smartbar.
With the text and image placeholders created and in position, we can now replace them by using the variable data wizard. The variable data Wizard can import a number of file formats such as .txt , tab delimited text, .ods, Open Office Spreadsheet, .xlsx, Microsoft Excel Workbook and CSV text files:
- Click on the “Variable Data Wizard” icon in the toolbar to the left.
- Tick the “Replace data” file box in the top left of the dialog.
- Click “Browse” to navigate to the file containing the data replacement information.
- Select the file and click “Open”. The number of entries in the file is automatically recognized.
- Change the function setting for text and images from “None” to “Replace”.
- Click “Next”. The following dialog allows you to create custom material output sizes for the badges.
- Click “Next”. You should now see the “Text Substitution” dialog.
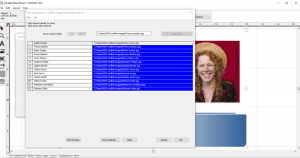 You will now see the columns representing the image and text. When VDW read the data file, it loaded the columns in reverse order. If you remember when we were setting the function of each set of data earlier, the text was first and the image set was second. To fix this:
- Click the header of the first column, the column will become highlighted. The arrows for “Move Column Data” found above the columns have now become active.
- Click on the right arrow and you will see the selected column has now moved to the right. This now matches the order of the data used on the badge.
- With the columns in the right order, you can click “Next”.
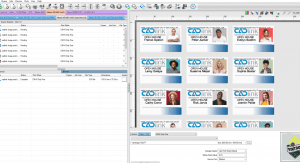
The badges are now automatically created and loaded as print jobs in the queue with the names and photos in place following the template. They are now ready to be printed on a flatbed printer or any other device that might need exact positioning such as garment printers, UV printers and laser engravers.
We hope this helps expand on your VDW workflow. When used properly, it can save hours of layout work and make for a much faster production!