 Many graphics professionals are all talking about one process: producing a direct to film job. Using Digital Factory Direct To Film edition, getting a color accurate, low cost, good feeling print is easy. Let’s take a look at the process, covering:
- Verifying your settings.
- Setting up ink order.
- Checking rasterization.
- Performing a test print.
- Printing the job.
CADlink’s Digital Factory Direct To Film edition allows you to prepare your job, manage color, and automate your production with built-in tools. To get started, we are assuming you have your printer installed. If not, go check out the video How To Install And Set Up Your Printer In Digital Factory DTF Edition.
If your printer has sat inactive for a period of time, it is suggested that you perform a nozzle check with your printer’s utilities. This way you can rule out hardware issues if you have problems when printing. Your next step before printing your first Direct To Film project is to verify your printer setup, such as ensuring you set the proper printer port, paper selection, page layout and paper source.
You can check the printer port by:
- “Queue” menu
- Select “Manage Queues”.
- In the dialog that opens you’ll find the name of the queue that you will be using, along with your installed printer.
- In the third column you can see the port that the printer is using and whether it is a usb connection or an ip address on the network.
After closing the Queue Manager, you can check the other settings of the queue that you are using. The common settings for the queue are found in the “Queue” tab found in the bottom right when the active queue is selected. Confirm you have the correct Printmode selected for the job, as well as the correct paper type, layout, and paper source.
After you’ve established these settings are correct, check the ink order of your printer. This will vary depending on the printer you are using.
 With the queue selected:
- “Queue” menu.
- Select “Set Ink Order”.
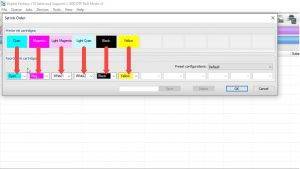
- This dialog shows the ink cartridges your printer has and the order in which they are installed.
It’s important to ensure the order matches the physical ink cartridge so the printer uses the correct ink color when printing the job. If the order is incorrect the result will be an unusable product. This feature is designed to work specifically with Epson-based printers and won’t work with other import-controller based machines.
Once you’ve completed the preliminary setup:
- Go to the “Devices” menu
- Select “Quick Print Test” found at the bottom.
This generates a color chart used by CADlink to check ink order. There are labelled swatches allowing you to quickly see if there is an issue with ink order. If the swatch is labelled yellow but you see another color, your ink cartridges are in the wrong order.
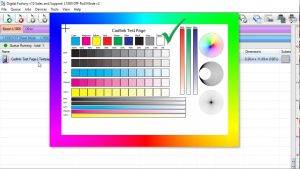 With the CADlink Test Page selected in the queue, click on the print icon above. If the output demonstrates that your inks are in the correct order, you can move to the next step to ensure your profile is producing colors to your specifications.
- Go to the “Device” menu
- Click on “Print Test Page”. A dialog will open with a list of images.
- Find the file labeled “Profile test chart” select it and click “OK”.
- Select the job in the queue and click on the “Print” icon. This print out contains photographs and gradients to check color accuracy.
If the test print meets your desired quality level, you can then move ahead with your print jobs. If there are issues with colors, there are a few places you can make quick adjustments without getting too deep into color management settings.
With the job selected in the queue, look to the lower right, there are three tabs. To adjust the settings for all jobs coming into the queue:
- Click on the “Queue” tab.
- Click on the “Color Adjust” button. This opens the Easy Color Adjustments dialog.
- This dialog will have 3 tabs, “Color Adjust“, “Processing Options“, and “Ink Removal“.
Color Adjust values are set according to the ICC profile that you are currently using. Here you can:
- Increase or decrease the amount of CMYK used in the job.
- Reduce the total amount of ink used.
- Increase or decrease the brightness.
- Increase the saturation.
You have the option of selecting photo which is tweaked for better results when printing photos giving better skin tones but you can lose vibrancy in the overall image. The graphic option will make the image pop a little more, but can have a negative effect on gradients and skin tones. In the photo mode you have the ability to merge the photo values with the graphic values, allowing you a little more control of the image. To learn more about the color adjust settings please watch How To Make Simple Color Adjustments In Digital Factory.
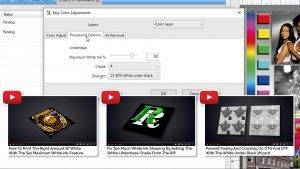
The Processing Options tab gives you control of a number of under base options such as:
- Max white ink.
- Choke.
- White under black values.
 These can be more closely explored through three existing videos:
- How To Print The Right Amount Of White With The Set Maximum White Ink Feature
- Fix Too Much White Ink Showing By Setting The White Underbase Choke From The RIP
- Prevent Fading And Cracking On DTG And DTF With The White Under Black Wizard
Ink Removal is used when rasterizing images. Here you can set the hole size as well as the hole size in areas of partial transparency. Ink limiting can also be controlled in the queue properties:
- Close the current dialog.
- Double click on the tab of your queue. This brings up the “Queue Properties” dialog.
- Click on the “Color Layer” section on the left column.
- Click on the “Ink Removal” option found at the bottom of the “Color Layer” options.
- Click on “Enable” in the area on the right.
- You will now be able to affect the frequency, angle, and shape of the dots in the rasterized image.
Here you can see you can also change the hole size as you did in the previous Easy Color adjust dialog. Digital Factory often includes Raster printmodes that already have ink removal enabled.
After you have made any adjustments and verified the test print, you are now ready to print your own job:
- Load the job into the queue (click on the open job button in the Smart Bar at the top and navigating to your file, or by right clicking in the queue and selecting “Import File”).
- Once the job is loaded, you can preview it on the right. You can change the preview background with the color of the substrate you are printing on.
- Go to the “Set Substrate Color” button at the top of the preview window on the right.
- Select the color of your shirt. This option does not affect the actual output and is only a visual representation.
You can also see another form of preview by:
- Right clicking on the job in the queue and selecting “RIP only”.
- Once completed right click again and select “View Raw Data”.
The first time you will have a dialog display stating that this is only a representation of the process output and the colors displayed may not accurately reflect how they will look when printed. This preview is meant to show you a representation of each ink color printed. To learn more about this feature, please watch Using The View Raw Data Feature To Preview Your Print Layers.
Finally, to print your job, click on the print icon in the smart bar above or right click on the job in the queue and select print. If you are not happy with the output. Return to the previous dialogs to make more adjustments.
You can also follow along with this guide in our video: