 We’ve covered some tools that make working with the queue based workflow found in Digital Factory and FilmMaker before. What about managing the queues themselves? Let’s take a look at how we can work with grouping queues and configurations to make them perfect for your production.
A single queue tab contains configuration data for printing to a specific combination of inks and substrate. Queue tabs can be grouped, such as the default configurations for black, white, and color garments.
You can setup queues as required, such as one queue per printer, though this lacks the versatility of the grouped queues.
For example, each default group contains a queue for graphic illustrations, and photographic artwork. Graphics refers to logo designs, where visually effective colors are more important than accuracy. Photos refers to artwork requiring accurate color reproduction, such as skin tones.
Configuration data for a queue is called a print mode, and each queue has its own print mode. For a selected job, the SmartBar shows the print mode assigned per its queue.
Though you can choose another print mode for the job, such as a lower resolution that prints faster.
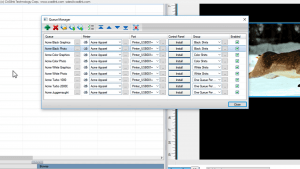
To create new queues, or rearrange existing queues, go to:
- “Queue” menu.
- “Manage Queues”.
Notice how the queues are organized into groups. For a selected queue, change its position using the arrow controls found in the Queue Manager.
- To duplicate a queue, click “Copy Queue”, then rename and modify the queue as required.
- Under “Control Panel”, click “Install” to show the queue in the “Print” dialog for other applications.
- Hide a queue by clearing the checkbox marked “Enabled”.
If your printer is not listed, or to update the printer driver and support files, then choose:
- “Devices” menu.
- “Manage Devices”.
If queues cannot be seen, then click to scroll. Right-click to choose visible columns. Rearrange columns to keep information in view, such as Job Cost.
You can also rename a print mode by going to:
- “Queue” menu.
- “Properties”.
- “General”.
When setting the print mode, each of these provide consistent quality over a range of inks and substrates from different manufacturers. Advanced users can refine settings using the Queue menu wizards.
Finally, the Color Adjust button provides simplified controls, including the “Merge” slider for blending rendering intents.
With these tips, your queues will be set up and ready for any production you can imagine!