 To get the very best color accuracy, no matter what your design is, Digital Factory allows you to merge rendering intents. A rendering intent is a method to convert colors from one ICC profile to another. It deals with the problem of bringing colors from a bigger color gamut into the smaller color gamut of your printer. If that all sounds like a confusing bunch of jargon…well…it can be! That’s why we’re here. Photo Merge makes it easier to become a color expert.
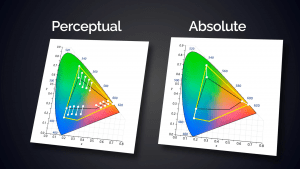
Photo merge allows you to merge a perceptual rendering intent with an absolute rendering intent. Perceptive rendering tries to compress the source gamut into the destination gamut in such a way that the overall color relationships are preserved. Absolute rendering by contrast attempts to reproduce all colors numerically using destination equalling the source. If colors are out of the color gamut the closest color is chosen.
Generally speaking, the perceptual intent is the better choice for photographs where absolute might do a better job with corporate colours. Merging these together optimises the color output.
To access the Setup photo merge wizard:
- Go to the “Queue” menu and select “Setup photo merge”. This will give a warning that the rendering intent will change from Graphics or ICC Settings to Photo for the queue you are in and the ICC settings in the printmode will be ignored.
- Click “Yes”
- In the resulting “Setup merge for photo rendering” dialog, set the bed size, choose the artwork you are printing and set the size you want to print allowing multiple samples on one page.
- Click “Next”.
- In the “ICC Photo” settings, select the minimum and maximum values for the amount the photos are merged and choose an increment amount.
- Click “Print photo merge chart”.
- Click on the queue seen behind the photo merge wizard.
- Right mouse click on any of the jobs and select “Print” or press the print icon found above the queue.
- After reviewing the printed results and having chosen the desired photo merge amount, go back to the “Setup photo merge” dialog and type the preferred value in the field on the right side of the dialog
- Click finish.
If you click on “Color Adjust” found at the bottom right, you will open the “Color Adjust” dialog, and you will see that rendering intent has changed to photo and the photo merge value has changed to result of 100 minus the value you chose for the photo merge.
If you’re still unclear about how to perfect your Photo Merge settings, check out our video below for a helpful walkthrough on the feature!