 Want to get a better idea of what each print head is doing when you go to print? Need to change settings on a per-layer basis? Each print head pass over the substrate uses a set of Layer Profile tab controls applied for that pass. Within these menus, you can configure the layer properties and print head options.
Select:
- “Queue” menu.
- “Properties”.
This queue outputs to black garment material, so there are two layers: one for the Underbase pass that prints white ink, and one for the Color pass that mainly prints CMYK. Each set of layer tabs are defined by the print mode listed on the General tab.
The order of these layers indicate their printing order. In comparison, a queue configured for white garments does not need an underbase.
Each layer has its own set of tabs: the main Layer Profile tab, plus:
- Processing Options.
- Printer Options.
- ICC Profile.
- Halftones.
Advanced tabs can be shown by turning them on vi: when the
- “Tools” menu.
- “Options”.
- “Show Advanced Settings” is enabled.
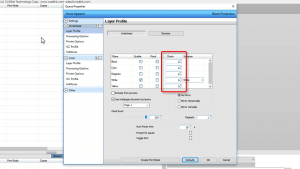
On the Layer Profile tab, note the color channels that the printer recognizes. In addition to CMYK, most printers will support white ink. If the printer supports additional spot colors, such as a clear finish, or perhaps a spot red or spot orange, they would be listed here. The Underbase layer only shows the White channel active, whereas the Color layer has CMYK and White.
 Choke values can be negative (i.e., a choke), or positive (i.e., a spread). For a job file that already contains a white underbase, the choke will be applied when received. Generally speaking, a choke in the range of -3 to -5 should be adequate. If you need less than -5 choke, your printer likely has mechanical issues.
You can read more about setting your choke/spread settings in our previous post.
When a file is received, underbase data must already be defined in the file, otherwise underbase data will be automatically generated. For automatically generated underbase, set choke on the Processing Options tab.
For a finishing coat, where protective dots are printed atop (the dots of) the color job, a small spread causes the finish to cover a larger area, thereby improving the longevity of the print. A spread of 3 to 5 is considered acceptable.