You have a design you love, but a cut shape that makes it difficult to line up exactly. You could spend hours trying to position your design, but why not leverage the power of the queue to do it for you? With this feature, you can use your existing clipping path to clip your design to your template. Lets see how.
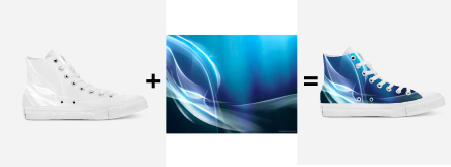
You can use an existing path (HPGL .plt files) as a clipping path for a template. For example, clipping can create a fixed path for a shoe print.
To get started:
- Slot must have cut path assigned
- Job may be clipped once
- Slot ID cannot be repeated for multiple slots
To create a clipping path:
- Create clipping paths using , Illustrator, or CorelDraw.
Note: Scale the path size in the design application before exporting. - Export the paths (HPGL .plt files) and save them in the following folder: C:\Program Name\cutpatterns.
For example: With the shoe template, you could name the clipping path “BlueShoePath_sizeX.plt”.
Setting up a template:
- Select a queue.
- On the Queue tab, select the Template drop-down and click the ellipsis button to edit or click Add New Media.
- Create or modify a template and add a custom cut pattern.
For example: With the shoe template, you could name the template “Blue Shoe size X”. - Set the scaling and rotation.
Note: The path is centered in the slot. - Ensure you position the slot for the clipping path using the size and position fields.
- When finished, click Save.
To clip a job:
Note: To clip on import, go to Queue > Properties > PDF Setup.
- Ensure the template media you created is selected in the Queue tab.
The clipping path should show in the preview. - Add a job to the same queue.
The Import Template Job dialog appears. - Make an import selection.
- Adjust the size and position of the graphic.
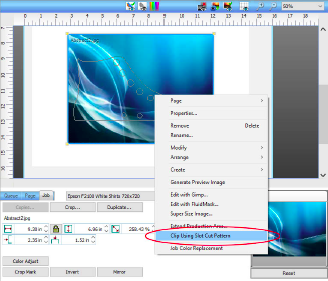
Note: Ensure you are done editing prior to clipping. - Right-click the job in the preview and select Clip Using Slot Cut Pattern or select the job and go to Jobs > Clip Using Slot Cut Pattern.
The job is clipped to the slot cut pattern. - Click Print.