 Getting a precise cutline is easy when you know the basics of bezier editing, found in the contour cut feature of the Variable Data Wizard. We will demonstrate a general overview of functions such as bezier node styles, move lines, break, join, connect, and add and remove nodes.
To access bezier editing in the VDW, right click on the job in the queue and select variable data wizard. Once in VDW, create a contour cut using the method previously demonstrated in one of our previous posts.
After the contour cut line is created, click on the work area outside the graphic to deselect all objects, then select the contour cutline. When the line is selected, you’ll see that the bezier node edit tool has become active. Click on this tool to start editing the contour cut.
If this is the first time using this tool, you will see a dialog telling you the contour cut path will no longer be automatically modified by the shape of the variable data that you are using, whether its text or graphics. You have the option to tick the box to stop this dialog from popping up in the future. For the purpose of this tutorial, I will click ok.
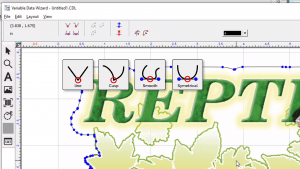
After selecting the bezier node edit tool, the smartbar above has become populated with new icons. On the left you have icons to set the different style of nodes. These are break, join, connect, add nodes, and delete nodes. The last icons are node edit and segment edit which will be covered in a second video.
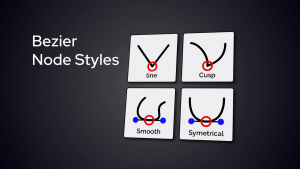
The icons on the left of the smartbar set the style of node that is selected, and as a result, change the type of handles the node will have for editing. The handles control the arc and curve of a line. The four styles are Line, Cusp, Smooth, and Symmetrical.
 Let’s take a closer look at the bezier node styles. You have 4 styles:
- Line style. This is active when the line and cusp icons are clicked. You will have one handle on the node for editing the path.
- Cusp style. This gives you two handles which move independently of each other both in length and angle.
- Smooth style. This style uses two handles whose angles are linked but can have separate length giving them separate influence over the curve.
- Symmetric style. Here you have two handles which move together in an angle as well as length, giving them equal influence on the curve on both sides of the node. You can also click and drag the line to adjust the path.
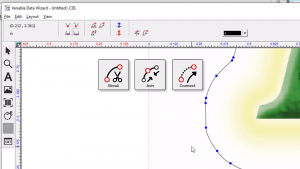 The next set of icons on the smartbar to the right include break, join, and connect. When you select a node the break icon becomes active. This will break the path at the point of the selected node.
When you have a node selected, you can right click with your mouse and collection of icons will appear around your cursor. These include the four styles of nodes just mentioned, an icon to change the direction of the cut, an icon to set the start point, and finally the delete, break and join, and connect icons.
To close the path, click and drag the mouse around the two end nodes of the open path. The connect and join icons in the smartbar are now active. Connect will merge the nodes and convert them to one node resulting in a closed path. Join will create a line between the two nodes creating a closed path.
The next two icons in the smartbar are delete node and create node. To use the delete node, click on the delete node icon to toggle node deletion on. Now click on any node on the bezier curve and it will be removed from the path. The path remains intact, but the path shape may be altered. If you have a number of nodes to remove at once, you can save time by drawing a marquee around the nodes you wish to remove.
After drawing the marquee, release the mouse button and the marquee selected nodes will be deleted. When you have finished deleting nodes, click on the delete node icon to toggle it off.
To add nodes, click on the add nodes icon to toggle add node on. Click anywhere on the bezier path and a node will be created. To turn off add node, click on the add node icon again to toggle it off. Another way to add nodes without having add node activated, is to double click on the path and a node will appear where the mouse was on the path.
To see these tools in action, check out our video below: